A number of people responded favourably to my photos and blogs about our recent climbing holiday in Italy, with several saying that they’d been encouraged to find out more about the sport of Via Ferrata, or wished that they could do it. I’ve decided to write some blog posts to act as an introduction for getting into the sport, and I suspect some people may find it easier to start doing than they imagined.
Who is this aimed at?
OK, so the sort of person I’m expecting to be reading this is perhaps someone who has done some amount of hill walking in places like Snowdonia, the Scottish Highlands, the Peak District or the Lake District, or perhaps even in alpine mountains. They’re probably comfortable with a bit of rough ground or basic scrambling, and want to spice things up a bit.
I’m not assuming any climbing knowledge. Having some helps, and I’ll get on to that later, but you don’t need to be a climber to get into this sport.
Am I at the right physical and mental level?
There are some straightforward prerequisites in terms of fitness and psychology that we need to get out of the way at the beginning.
The most obvious one is fitness. You will need to be “hill fit” to do this sport. There’s quite a bit of walking, and most of it isn’t flat. Many routes have significant altitude gains before they start, and often long descents. You’re going to need to be able to handle this. Since Sylvia and I live in Cambridgeshire, which is the lowest and flattest county in the UK, it’s pretty much impossible for us to maintain hill fitness here. Before we went away this year, we did a couple of vertical kilometre walks in the Peak District. They helped tremendously.
So yes, you should be comfortable with hill walking. The other thing you need to be aware of is exposure, and how you react to it. Lots of Via Ferratas (most, in fact) will feature some level of exposure. Even the simplest ones will often have you walking on easy ground with a precipitous drop to the side. The first thing to note is that on the easiest routes, it’s physically impossible to fall unless you do something stupid, so the nature of the risk is in your own reaction to exposure, rather than any actual risk of falling off a mountain.
Note, this is not true of the harder ones. You can fall and you can die on those, but the key to preventing that is to be properly prepared and have the proper skillset.
So you need to know how you respond to exposure. The first time I was exposed to a really massive drop was on a trail called Angels’ Landing in Zion National Park, Utah, US. It looks like this:
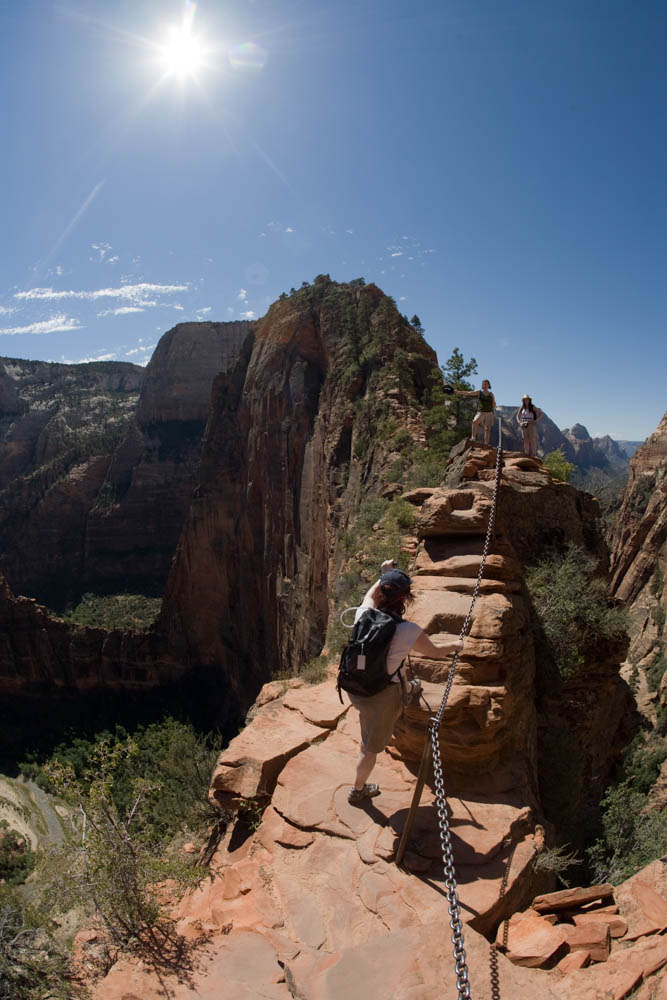
Angels’ Landing, ascent from our 2008 holiday there.
Note that Angels’ Landing is not officially a Via Ferrata, but it’s often said that along with the ascent of Half Dome at Yosemite, it was one of the closest things the US has to one for a long time. Sylvia and I agree that if it had a via ferrata grade, it would be 1B.
Anyway, I first encountered this in 1997. The drop is up to 400 metres on both sides. For the first time in my life, at the age of 23, I had a panic attack. I thought I was going to die. Apparently I went a sort of pale yellow and getting me off the mountain was quite difficult.
If this is your response to exposure, you need to fix it before you do this. Having a panic attack half way along a via ferrata is … inconvenient.
The good news, as evidenced by me, is that it can be fixed!
I’ve talked to Sylvia about this and we both agree that anyone in the UK contemplating getting into this sport should have ascended Snowdon via the Crib Goch route, in good weather, and have coped with it.
Here’s Crib Coch. It’s a lot like Angels’ Landing, but colder. Sylvia and I agree that if it had a via ferrata grade, it would be 2B.
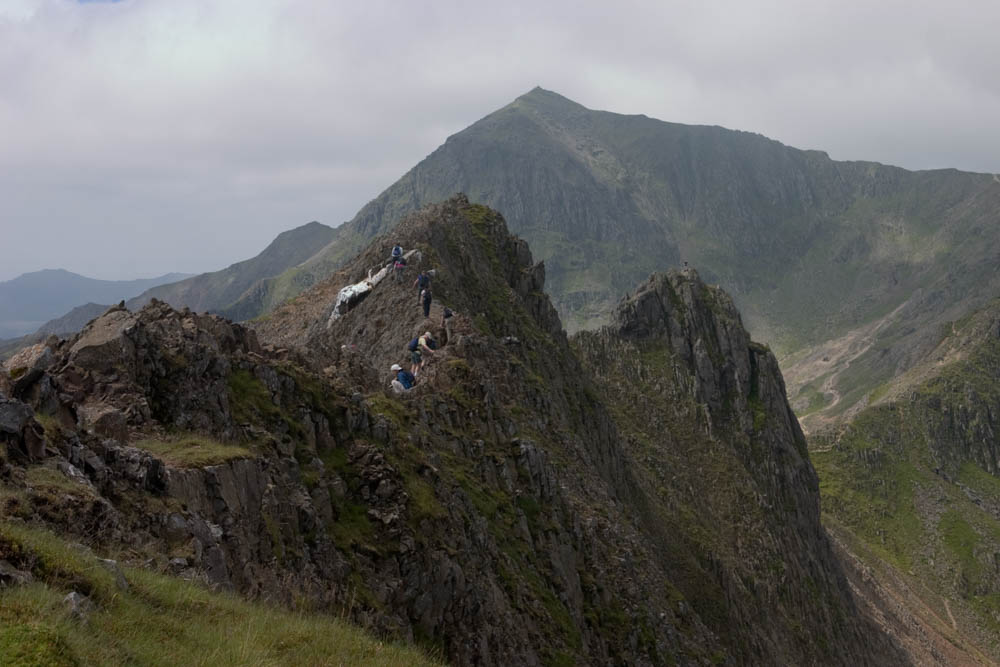
Photo of Crib Goch, with Snowdon in the background, from the first time Sylvia and I went there in 2005.
So yeah, you need to be able to cope with that. I understand there are similar walks in the Lake District, such as Striding Edge, but I haven’t done them personally.
Assuming you are happy with the whole hill walking thing, and know you can handle Crib Goch/Striding Edge/Angels’ Landing without going to pieces, then you’re good. Time to talk about:
Equipment
You need equipment to do via ferrata. If you’ve ever climbed, some of it will be familiar to you, some may not. Don’t worry if you haven’t, as this stuff isn’t rocket science. Here are the basics that you need:
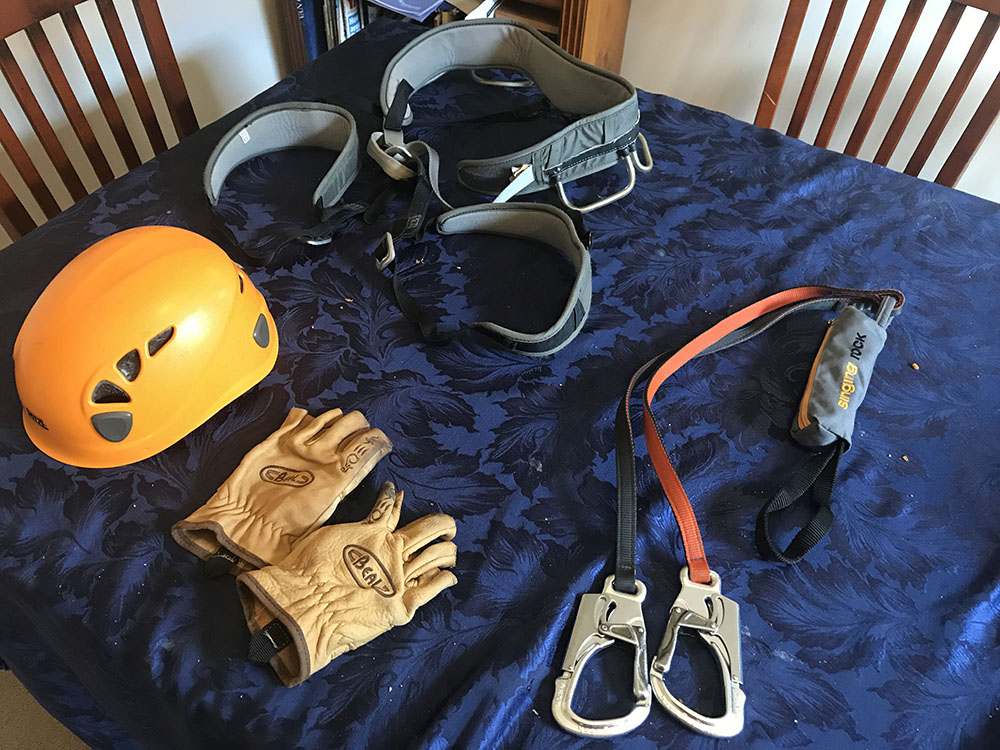
Helmet, climbing harness, via ferrata kit, gloves
The first thing you need is a climbing harness. You need to know how to put one on safely, and where the strong points are and how to use one.
This is not complicated, but you need to get this right. If you’ve never worn a climbing harness before, I strongly suggest you find a local climbing wall that offers a beginner course in roped climbing and take it. It will teach you how to use a harness and the basics of climbing. You don’t need to be a climber to do via ferrata, but you do need to know how to use the equipment.
A climbing harness is essentially a belt connected via a strong loop (called the belay loop) to a pair of leg loops. They’re comfortable to wear, comfortable to walk in for extended periods, and not cumbersome. They are designed to be lightweight, unobtrusive and worn all day. They’re also designed so that if you end up dangling by the belay loop, you dangle the right way up.
You will need a helmet. Some routes feature low hanging rock that will do you a nasty injury if you bang your bare head on it. Some have people above you who kick small stones down, and you need a helmet to protect yourself. Some via ferratas go through tunnels and you’ll need to attach a head lamp to your helmet, so it’s good to have one of those too.
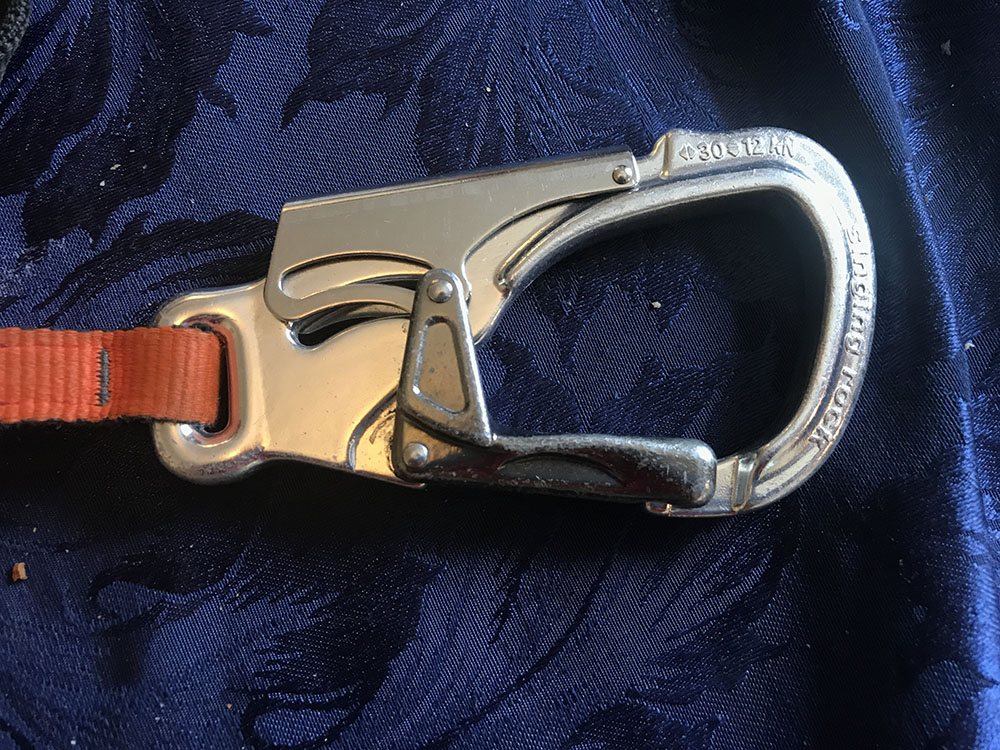
A via ferrata carabiner. It locks unless you squeeze both sides.
You’ll want gloves, because without them hauling a via ferrata cable will wreck your hands. The best gloves to use are belay gloves, sold at the same places that sell climbing harnesses. You definitely need them to be fingerless at the tips.
Perhaps most crucially, you need a via ferrata kit. In its modern incarnation, this is a pair of carabiners, specially designed so that they can’t come open by themselves (mine require you to squeeze both sides at once). Each one is attached to a piece of webbing sling, or a short length of rope. These meet at the screamer, which is your shock absorber:
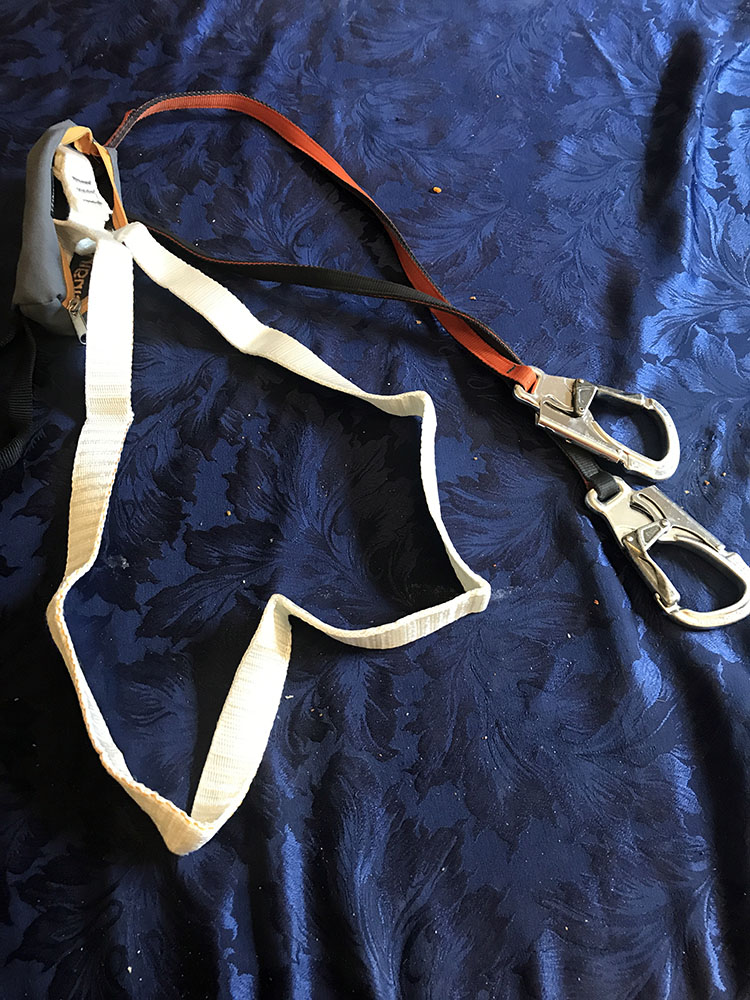
My screamer, intact but unfurled from its housing.
My screamer, shown above, is two loops of webbing. Each one connects at one end to the carabiner slings, and at the other end to the loop that attaches to the harness. They are sewn together using stitching that is designed to start failing when there’s more than about 120N of force applied. In a fall, the rows of stitches will pop, one by one, slowing you down until you come to a halt. After this, the kit must be replaced. I hope to retire my screamer, unused, after many years of service!
The next thing you need is a good pair of shoes. At this point you might be thinking, “Ah, I’m sorted! As a hill walker I have a nice pair of sturdy high ankled boots that I can use!”
Let’s stop right there. High ankle hiking boots are absolutely not what you want for this sport. They may be useful when hiking across the bogs of Bleaklow and Kinder Scout, but on a via ferrata they are a liability (unless your via ferrata features a glacier and your boots can take a crampon, in which case they’re a necessary evil).
You need what climbers call approach shoes. These look like trainers, but aren’t. They’re a cross between technical climbing shoes, which are great for standing on tiny bits of rock, but will cripple you if you try to walk in them, and trainers, which you an walk all day in. Crucially they have low ankles, so that you are able to move all your joints and get a good angle on the rock, and soles with a mixture of a tread for walking, and smooth climbing rubber near the toes for climbing.
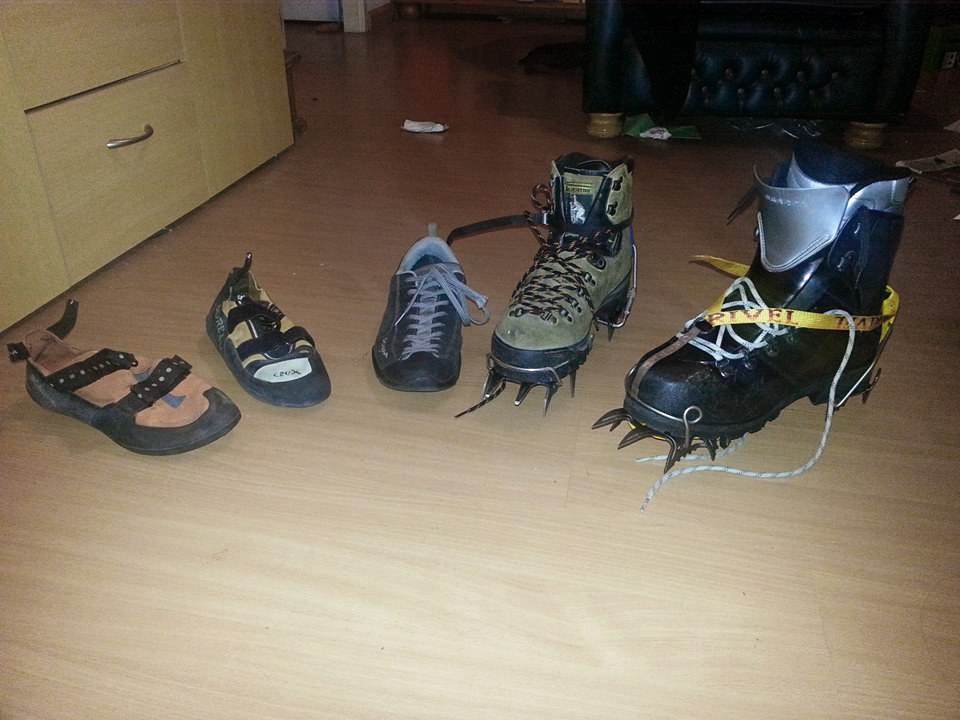
Courtesy of wikipedia, left to right: Two climbing shoes, approach shoes, mountain boots (with crampons)
The approach shoe is the one in the middle in the above image. It looks like a trainer. Don’t use trainers: the tread will make your feet will fall off the rock and you’ll hurt yourself.
OK, so that’s the gear we need: climbing harness, via ferrata kit, helmet (with optional head lamp), gloves, approach shoes.
And you’ll need suitable clothing for alpine summer work. I use outdoor trousers and a T-shirt made of quick drying material. I’ll then carry waterproof covers for my trousers, a lightweight waterproof jacket, and if warranted, a fleece, in my backpack. Some of these routes have snow and ice on them, but you’ll be working so hard that your problem will be being too hot, not too cold.
Where can you get this stuff?
Some outdoors shops sell most of this. Not the ones that are essentially fashion shops with an outdoors theme (although you can get the clothes there – if you’re a hill walker you probably already have them though).
In Llanberis, at the foot of Snowdon, there are a couple of excellent shops that can outfit you, and provide advice as they really know their stuff. In the Peak District I can highly recommend Outside in Hathersage. In Cambridge, Open Air on Green Street are superb.
If you do happen to go to a climbing gym to take an introductory course, most will have a shop that sells this stuff. You can buy it there.
The only bit you may struggle to get in the UK is the via ferrata kit. They can be bought in the UK, but most places don’t stock them because it’s not really something we do here. If you can’t find one, they can be found in abundance in places that have via ferratas (you will also find a really good selection of approach shoes there too). In Corvara in the high dolomites, I thoroughly recommend Sport Kostner. The staff are knowledgeable, friendly and most speak excellent English, and they have a range of good stuff. You can literally buy everything you need there in one afternoon, and they will be happy to sell you the lot for about €500.
There’s one crucial thing I haven’t mentioned that you need:
Guide Books and Maps
Guide books are essential, as are maps. This section assumes you’ll be going to the Dolomites, which is the spiritual home of the sport (although the Austrians have built more than anyone else. Some of their can be a bit disturbing though, I’m told!)
Perhaps the best all-round English Language guide book to via ferratas in the high Dolomites is Cicerone’s Via Ferratas of the Italian Dolomites, Vol 1. There is also a volume 2 that deals with the surrounding area, including the spectacular Brenta Dolomites. All the routes we did this year are in Cicerone Volume 1, with the exception of Magnifici Quattro, which they haven’t updated the guide for yet.
The Cicerone books are great. They describe the routes in detail, act as a good introduction to the sport, and are very atmospheric. They are starting to get a bit dated though, but I still think they’re a must have simply because of the level of detail they go into, and because they were, for a long time, the only info available on this sport for English speakers (they invented the grading system we use too).
More recently, climbing guide book publisher, Rockfax, have published, The Dolomites – Rock Climbs and Via Ferrata. This is much more comprehensive than Cicerone, uses the same grading system, and is more up to date. It’s more of a reference guide though and doesn’t go into the same level of depth.
We also have a German language book, with partial English translations, that is extremely comprehensive and provides detailed “topo” (route information) for each via ferrata. They use the German/Austrian grading system, but the level of route detail is superb. This is Klettersteigführer Dolomiten – Südtirol – Gardasee. It covers the areas covered by both volumes of Cicerone and comes with a DVD ROM that has a copy of the book on it as well as some videos, and GPX files with coordinates for parking and start points of all the routes, so you can take route information with you on your smartphone.
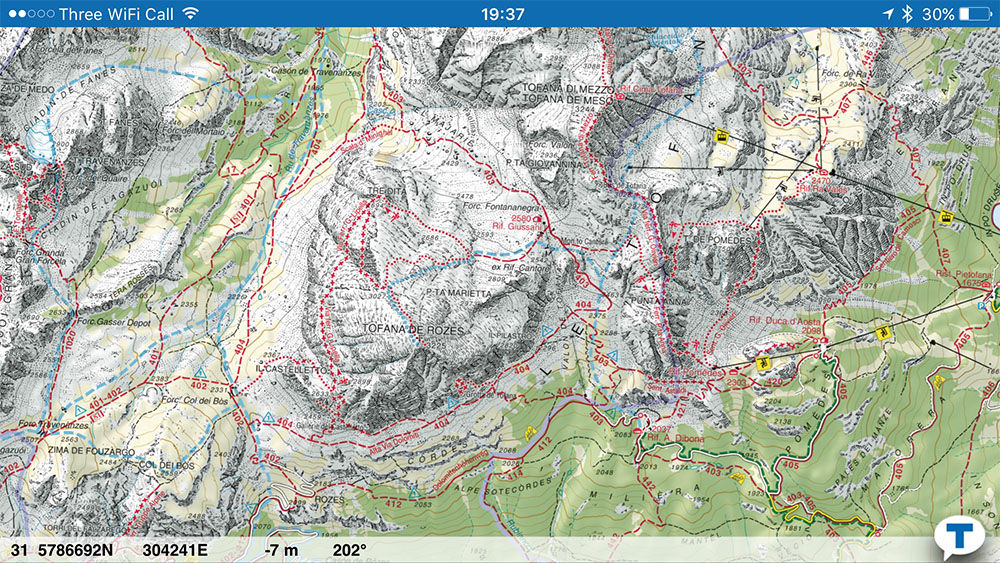
The Tabacco maps and smartphone apps are excellent.
The definitive hiking maps for the Dolomites are published by Tabacco, who do really good 1:25,000 scale leisure maps of much of the Italian Alps. They can be purchased at Stanfords in London, or at many shops out there. Tabacco also have apps for iPhone and Android that allow you to download digital copies of their maps. The app is where my route maps on my blog all come from.
In Summary
So, to summarise part 1 of my introduction: You’re a hill walker wanting to get into Via Ferrata. You should be able to do Crib Goch without freaking. You need to know how to use a climbing harness. Taking an introductory course at a climbing wall would be a really good idea. Get hold of some books and maps and start planning!
See you in part 2.