Before I get into what we spent the last 2 days doing, I need to write a few words of explanation about footpaths in the Dolomites. There are thousands of miles of “walking” routes here, maintained to various standards by various groups from commercial bodies (for example VF Sci Club 18) to the government (Italy has national service and some of the youths doing it opt to do it with the alpine troops, building and maintaining footpaths and via ferratas). These are comprehensively marked on maps. Some of them are kinda indicative as paths across scree slopes tend to get obliterated with the snow melt and reformed over the summer months. Some are paved. Some are protected with cables.
The maps need to distinguish these different types, particularly as this is serious mountain terrain and people have all sorts of different capabilities and experience. The definitive maps are published by Tabacco and they’re really good. They mark paved paths with solid outlines, well maintained, graded but unpaved paths with a solid red line, and then the line gets broken into smaller and smaller dots as the terrain gets harder. A path marked with small dots means you cam expect scrambling, scree surfing, possibly the odd stemple ladder.
Here, for example, is the map around Piz Boe: the highest peak of the Sella Group:
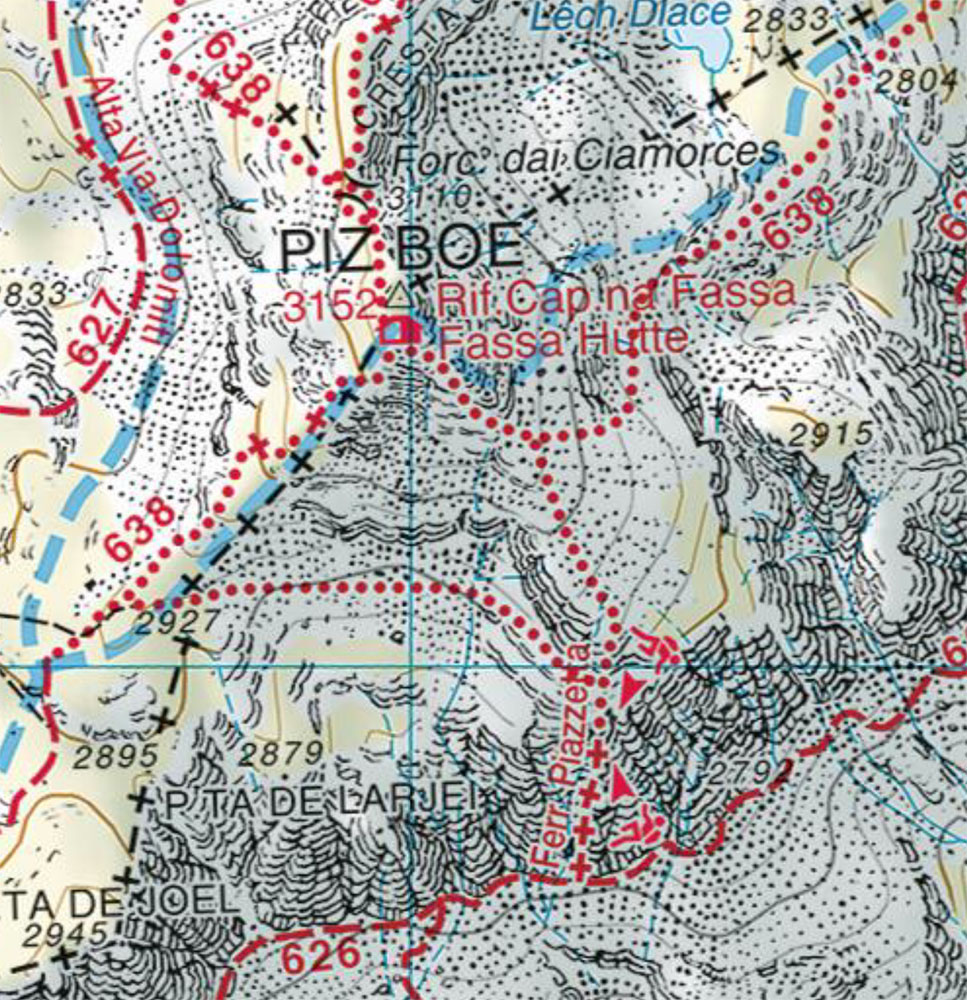
No paved paths up here!
In 2002, Sylvia who was working on an IT project at Trento at the time, suggested I come visit her and we could go hiking in these pretty mountains she’d seen. I grew up near the Peak District, but had never climbed anything in my life. I was happy with hill walking though, so we ended up drinking beer at the mountain refuge on top of Piz Boe, at 3152 metres. We then had to get back down to the cable car station. I saw what looked like a shortcut on the map.
“Why don’t we take this path?” I said.
“We can’t. See those crosses? That means it’s a via ferrata or protected path.”
“What’s that mean?”
“You need special equipment to use them. They aren’t safe without.”
And that was that, for 8 years until Sylvia, Zoe and I found ourselves back here in 2010, ready to find out what this Via Ferrata business was about.
The paths marked with crosses are either Via Ferratas, or protected paths. There’s a grey area where the two sort of blend into each other. As a rule of thumb, a Via Ferrata requires at least scrambling and a protected path doesn’t, but that’s not 100% definitive.
Basically, if you see a long line of crosses on the map, go that way and you don’t have a climbing harness, VF kit and helmet, and know how to use them, you are either going to be scared out of your wits, but basically OK, or you’re going to die.
So on to …
Day 3 – Cascate di Fanes
. After being given a thorough kicking by the Sci Club on day 2, I hurt. I had blisters on my fingers from cable hauling and my quadriceps were killing me. We decided to do some gentle exercise. There’s a easy, gentle gradient path north of Cortina that leads to a series of waterfalls, which are accessed by a “grade 1” via ferrata (they’re graded from 1 to 6. They used to stop at 5, but then … well, watch this space)
So I started to pack my VF kit and harness, until Sylvia said the guide book said they weren’t needed by anyone with any kind of experience. Happy to save weight, I didn’t bother. We jumped in the car and set off for Cortina.
A nice easy walk with pretty scenery.
We parked at the very busy carpark and set off along the trail. It followed the side of the River Fanes which is everything you expect a mountain brook to be: clear blue water, rapids, waterfalls, tributaries coming in from mysterious looking slot canyons. Lots of families with kids messing about at the water’s edge. Mountain bikers rolling past. It was really pretty, even if I did complain about my leg muscles every time the gradient hit.
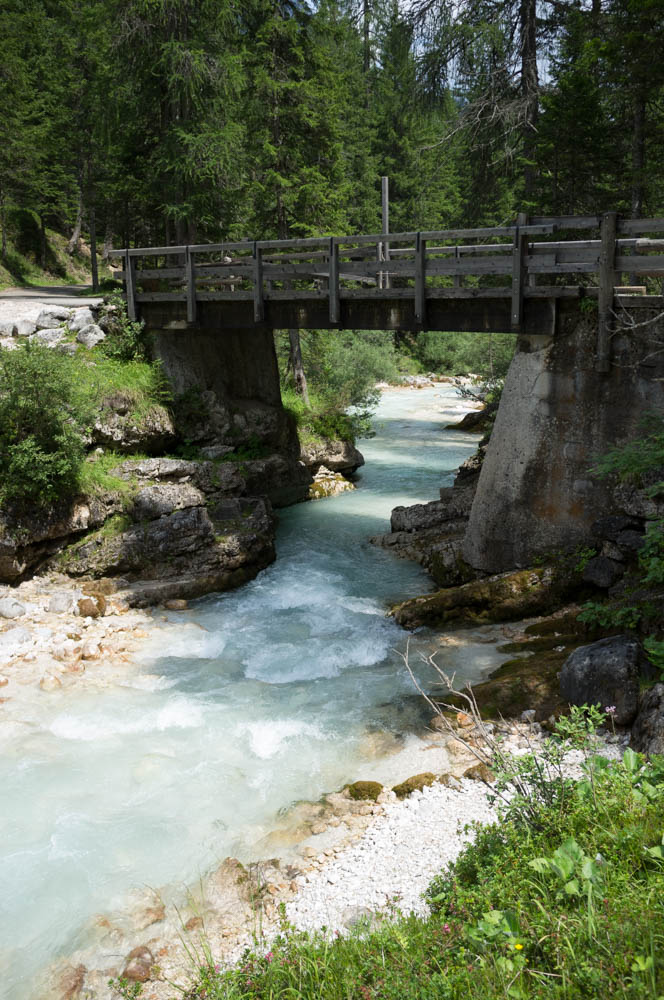
The River Fanes, doing its thing.
What we also saw were quite a few people walking along the path in brand new climbing harnesses with brand new via ferrata kits attached to them.
This is nice. Grade 1 via ferratas are fantastic for learning on. You get to familiarise yourself with the kit, see if you can handle some exposure and a bit of moving on rock, and it’s generally all very safe and straightforward. My first VF was a 1, and I used a VF kit on it too (if I was doing it now, I wouldn’t bother).
However, wearing your VF kit on easy hikes in is a bit of a faux pas. One reason is purely practical: you’ve got to store those long slings somewhere, and if you clip them to your gear loops they hang down in just the right place to catch your knee and make you have a nasty accident; embarrassing on a path you could drive a family car up without too many problems.
The other reason is, well, it can come across as showing off, and something you learn very quickly when doing this stuff is that some of the people you’re trying to show off to are probably well beyond your technical ability.
I’m reminded of a story about Sir Edmund Hillary walking up Snowdon via the Pyg Track. Someone, not recognising him, stopped him and castigated him for his recklessness in climbing such a dangerous mountain improperly attired. Didn’t he know the weather can change really fast up here?
Sir Edmund thanked the man for his advice, and carried on.
The ledge leading to the waterfalls. Note the cable for protection.
I have my own similar experiences. It never pays to make assumptions.
We arrived at the start of the via ferrata, and with no kit to put on, proceeded straight onto it. A short length of cable protecting a walk along a moderately exposed ledge led to the uppermost of two waterfalls. To my delight, I saw the path continued round under the waterfall itself. I suddenly felt like a twelve year old kid and simply had to go and stand behind the thundering water, so I did!

Fiddling with my phone to get a good video of the waterfall.
Then I called Sylvia under and made her pose for photographs until she complained she was getting soaked. I was also thoroughly wet, so we moved on. There was a bit of down climbing on easy rock with stemples, but the guy in front of me, with shiny new via ferrata kit seemed nervous and I didn’t want to spook him by getting too close when I was following with no equipment, so I waited until he’d reached the bottom before starting my own descent.
This led to a second waterfall, even more spectacular than the first. I took the opportunity to play with an iPhone app that lets me take long exposure photos even in broad daylight. I asked Sylvia to go and pose on a rock, and hold still, which she did, and then as she walked back she put her foot in the river half way to her knee. Oops!
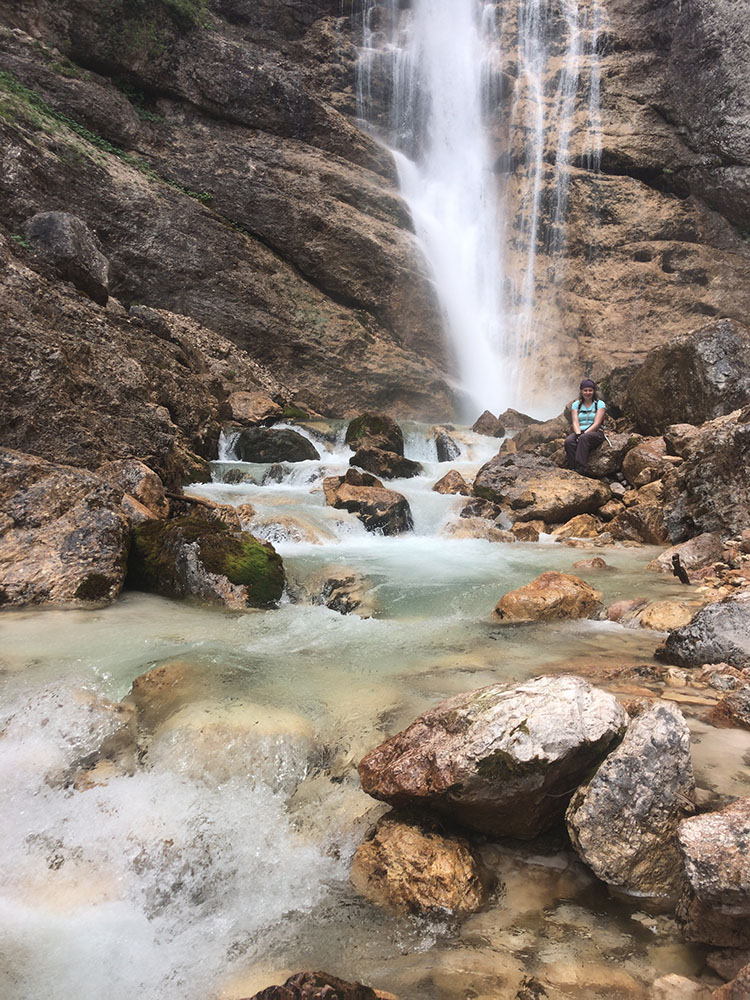
The lower falls, with posy long exposure water blurring.
Pretty waterfalls seen and excessively photographed, it was time to ascend via the rest of the ferrata (it’s a loop), which again had some basic scrambling and ledges with cables, before the pleasant downhill walk back to the car.
Day 4 – Messing about on the slopes of Tofana
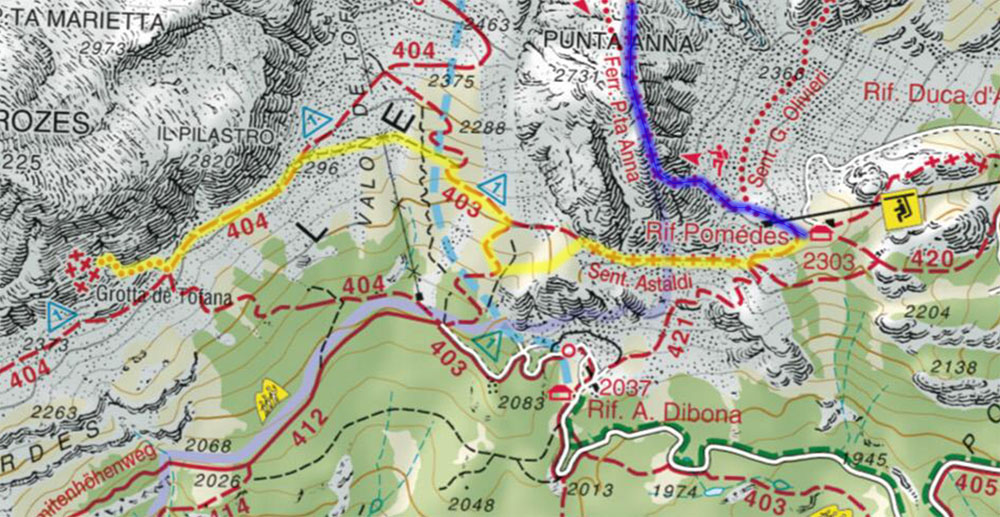
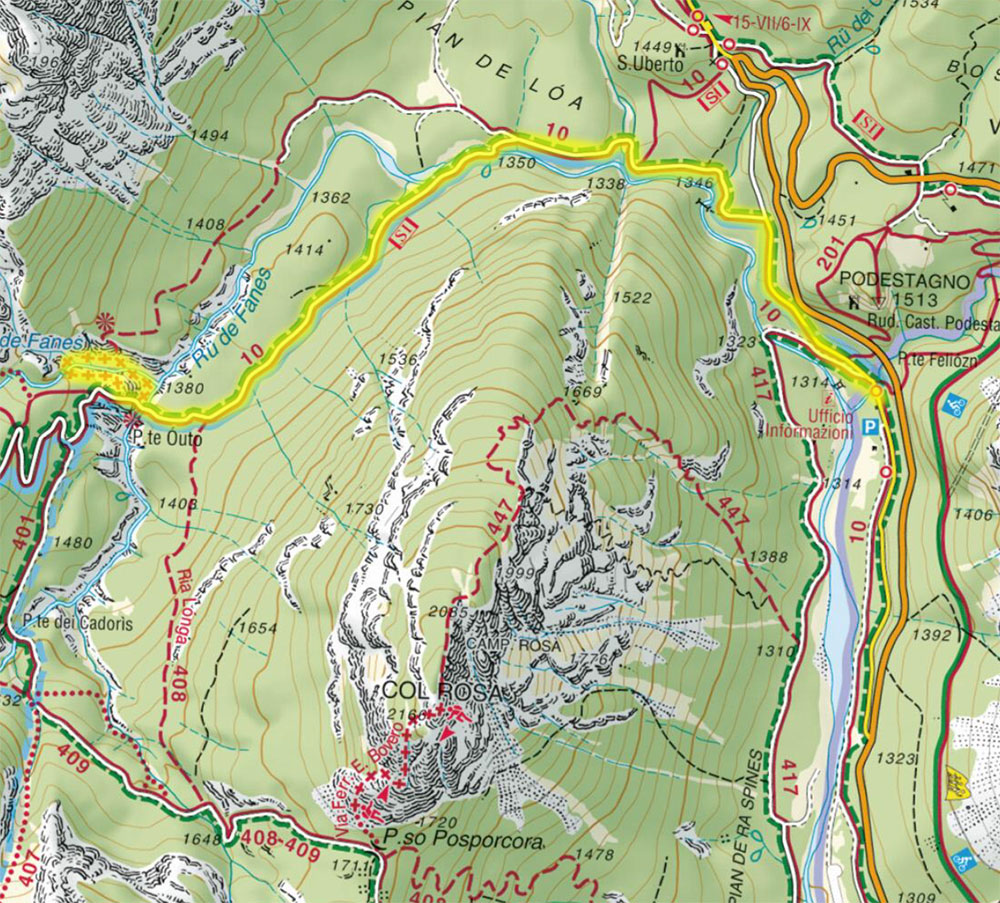
Blue – the start of our planned ascent. Yellow – what we actually ended up doing.
The forecast was for a clear morning with thunderstorms rolling in late afternoon. We were interested in climbing Tofana di Mezzo, the third highest peak in the Dolomites, via the via ferrata whose name nobody can agree on. I’ve seen it called VF Punta Anna (after the subsidiary peak of Tofana that it starts ascending), VF Giuseppe Olivieri (apparently he was a famous early 20th century racing cyclist), VF Aglio (literally “Via Ferrata Garlic” – there’s a pinnacle on Tofana named after this most delicious of foodstuffs) and VF Tofana di Mezzo (named after the summit it eventually reaches).

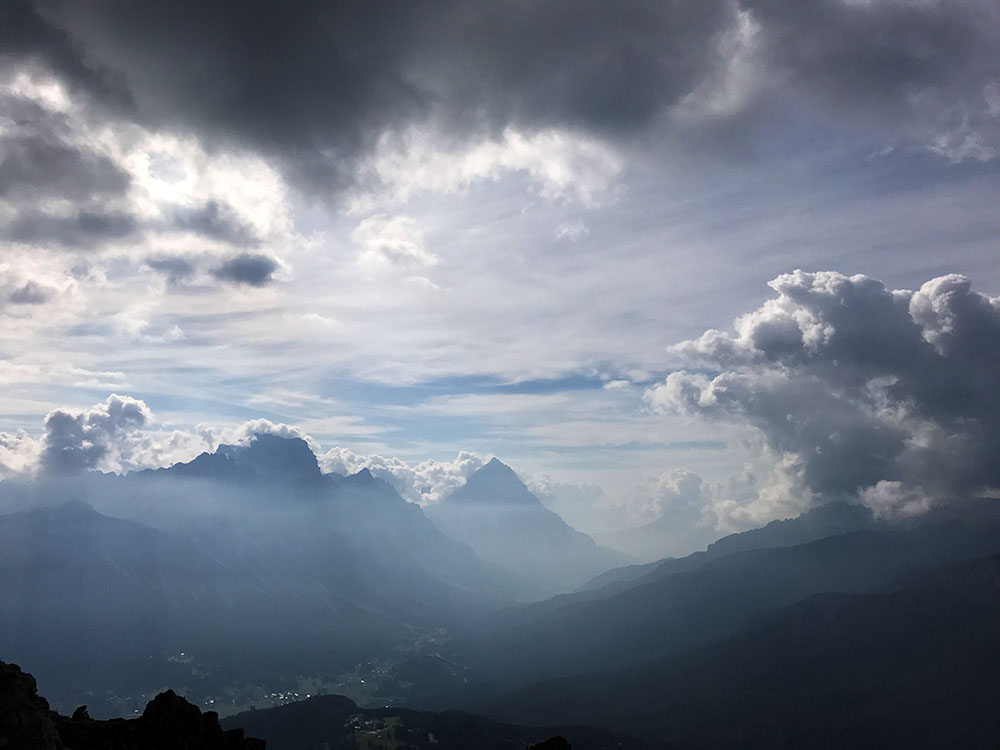
Looking south down the valley, with Cortina far below us. Scary clouds form on the peaks. The big peak in the distance is Antelao: the second highest in the Dolomites.
Increasingly “VF Punta Anna” seems to be winning this naming war. It ascends the south ridge of the Tofana massif. The climb is technical (not as hard as the Sci Club, but not far off) and really, really airy. You do not do this via ferrata if you can’t handle exposure because there’s a lot of it. The plan was to start early, climb, and given there were 3 well spaced escape routes, bail if the weather rolled in early.
We parked at the big carpark at Ristorante Pie Tofana (not actually one of their menu items) and took a pair of ski lifts up to Rifugio Pomedes, situated where the grassy shoulder of Tofana’s south east flank gives way to the towering buttress of Punta Anna.
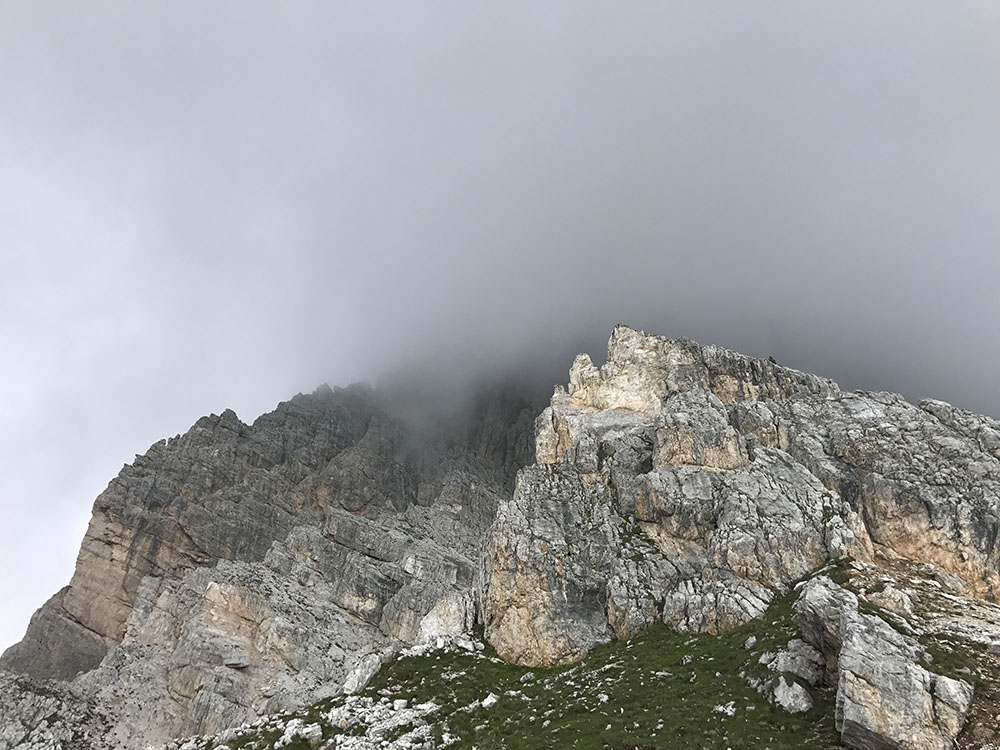
The towering buttress of Punta Anna disappearing into cloud. The ascent route follows the ridgeline.
It was 9am. An hour earlier there had not been a cloud in the sky. Now the vast buttress of Punta Anna had been lost in cloud, the base of which hovered mere tens of metres above us, and the distant big peaks of Sorapis, Antelao and Civetta all had towering cumulonimbus clouds forming over them. It occurred we were under something very similar.
Via ferratas are, predominantly, steel cables attached to mountains. They tend to go to summits and pinnacles because that’s cool.
An alternate name for this arrangement is “lightning conductor”. Climbing one inside a forming thundercloud is at best reckless. I’ve heard stories of people being welded to the cable by lightning strikes, and never being quite the same again, if they survive at all.
I looked at Sylvia. Sylvia looked at me. We made a decision: they were not thunderclouds yet. We might be OK.
There was pointing. There was the scratching of heads. There was … teeth sucking.
“Might” isn’t good enough when the penalty for getting it wrong is being turned into a charcoal briquette via one point twenty one jiggawatts.
“Fuck that”, we both said, and wandered the short distance to Rifugio Pomedes to replan our day over a cup of tea.
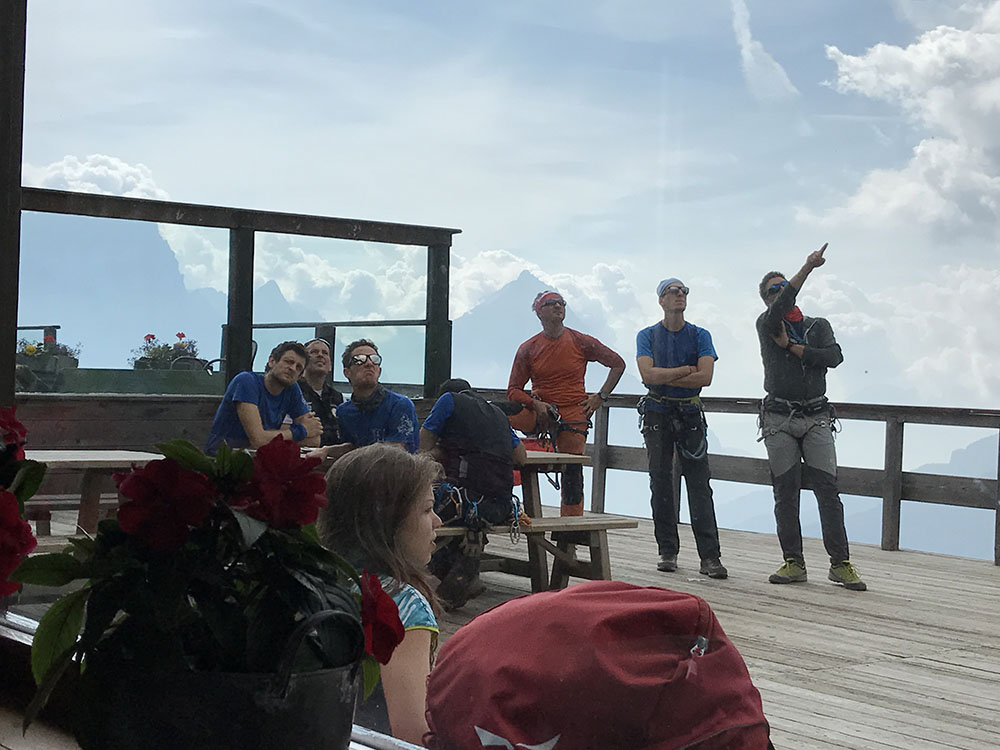
As we did so, a group of people arrived, all wearing via ferrata kit. They proceeded to gather on the terrace and look up at Punta Anna, and presumably have a conversation similar to the one Sylvia and I had just had.
I’m not their mother. If they want to climb in a thundercloud that’s their concern. Never found out if they decided to risk it or not, as they were still there as we set off west along Sentiero Astaldi towards the base of Tofana’s third peak: Tofana de Roses.
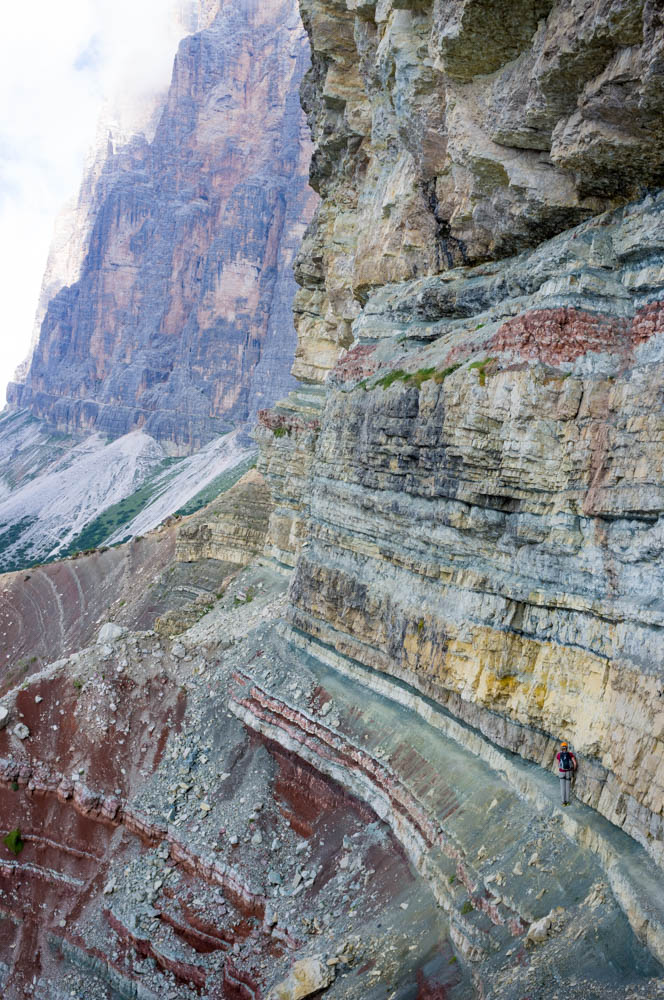
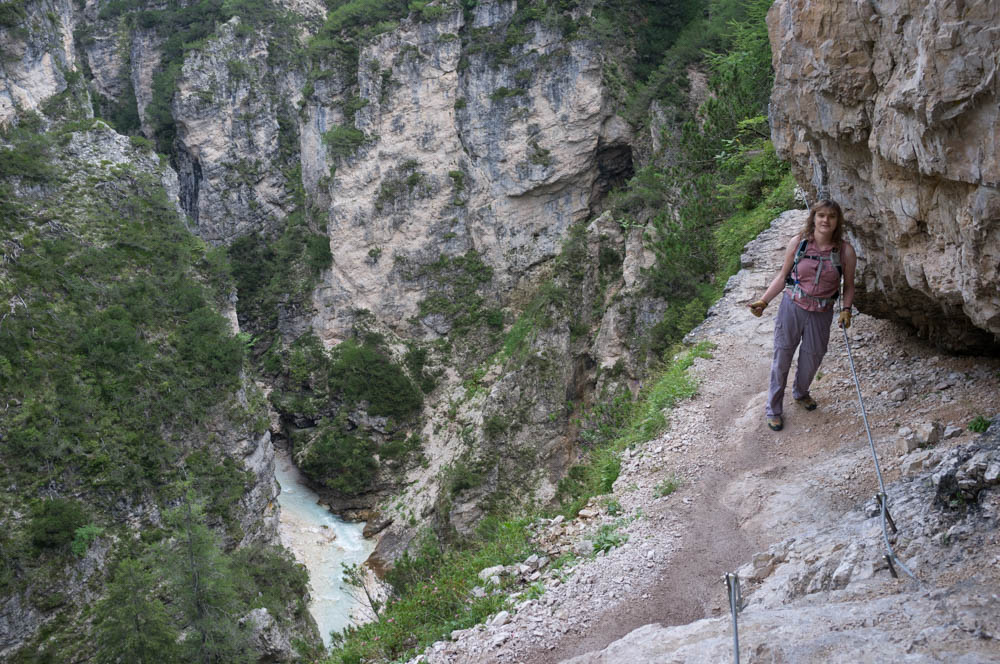
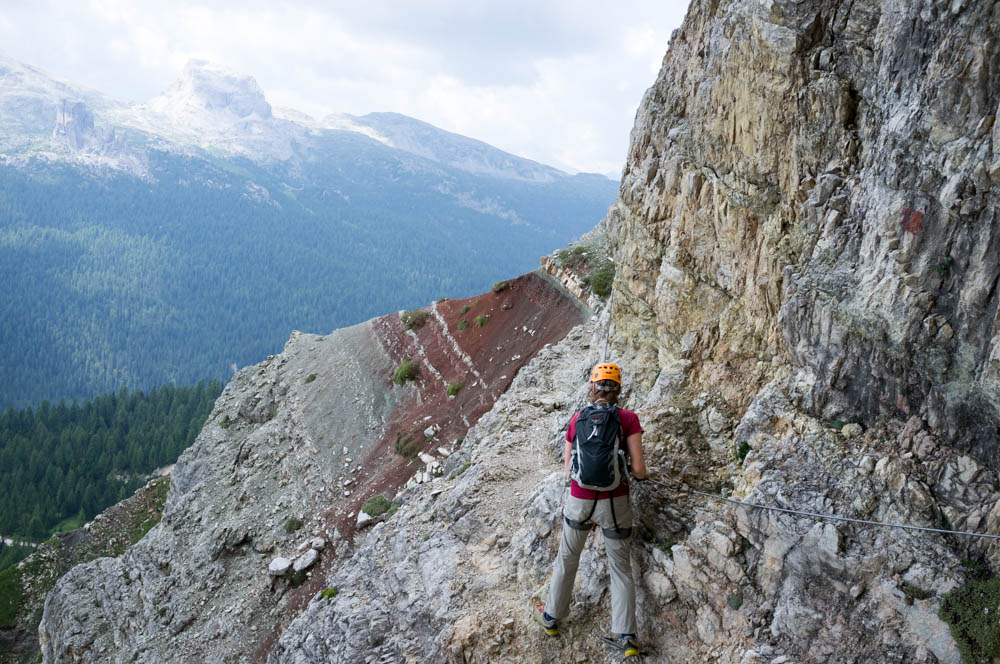
Me (lower right), on Sentiero Astaldi. Yes, this is a marked footpath on the map! The ledge is very narrow in places.
Sentiero Astaldi is one of those paths that’s marked with crosses on the map. It follows the line where Punta Anna meets Tofana’s lower slopes. For a few hundred metres the limestone at this elevation is infused with large amounts of iron and other minerals. This has two effects: it makes the limestone really colourful, and it turns it into choosy crap that will turn into sand if you look at it funny. As a result, erosion is rapid and plant life can’t get established to stabilise the scree slope. This means any transit is precarious in the extreme, and so it’s protected by cable.
It’s not a via ferrata, but unlike the walk to the waterfalls, which was, I wouldn’t dream of doing this without gear. The ledge is really narrow and the ground very unstable. It’s safe enough if you clip to the cable, and the alternative is a descent of nearly 300 metres followed by ascent of same.
So learning how to use VF kit can save you a lot of sweat by making otherwise inaccessible shortcuts available to you.
That being said, the protection on Astaldi is in appalling shape. The old cable has spots where it’s almost rusted through and has been reinforced with short lengths of newer cable. It’s not dangerous, but I wonder how long they can keep patching up before they need to properly recable it.
The protected path soon gave way to broad, safe walking paths and we removed our kit. Here you can either ascend the steep pass between Punta Anna and Tofana de Roses (this was one of our possible escape routes), descend towards Rifugio Diboba, or carry on along the base of Tofana de Roses. We chose the latter, and soon came to a junction with a path leading up to a grade 1 via ferrata to some caves. Above us were some rock climbers (doing it properly, not cheating using a VF), drawing oohs and ahhs from appreciative hikers.
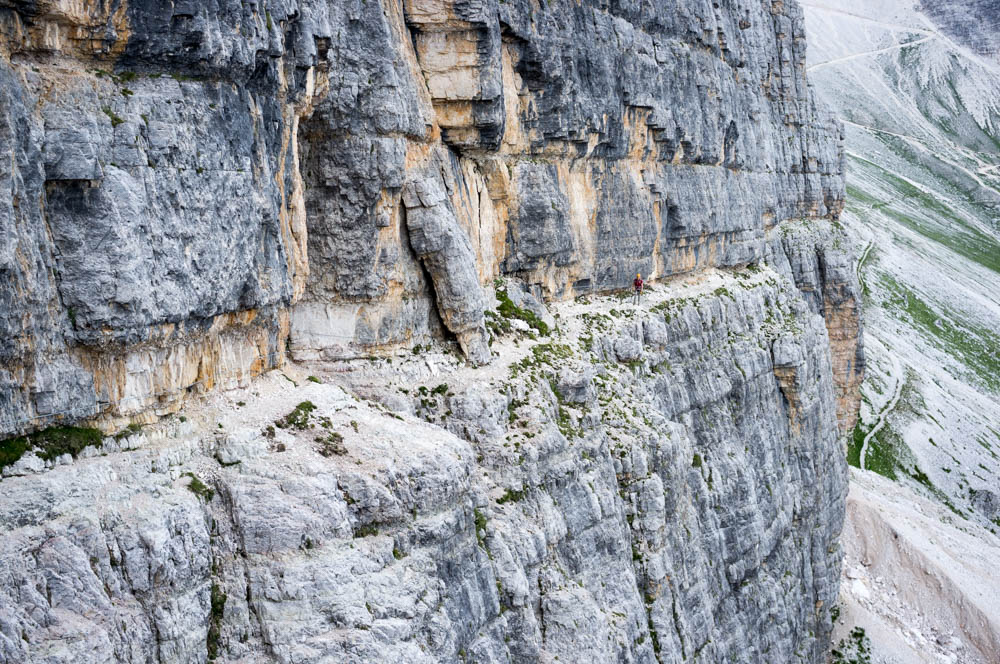
The via ferrata leading to the caves. I’m in this picture; can you spot me (click for larger version)
We decided to go and investigate the caves. Neither of us had been on this part of Tofana before, and it looked interesting. A short scramble up a cleft in the rock led to a via ferrata cable protecting a traverse along a ledge some 50-100 metres above the talus. Technically easy, but the presence of the cable is reassuring!
It was as we retraced our steps along this VF, as Sylvia took the picture of me above (yes, I am in it – click for a larger version) that a guy with a French accent looked up from the path below, waved, and declared, “You are crazy! You are crazy!”
I responded that the view was nice, but I’m getting ahead of myself.
The cave was awesome. Not some little dent in the rock, but a proper deep cave with junctions and mysterious side passages and rockfalls and stuff. Without my head torch the interior would have been utterly pitch black. The cave soon came to a junction, and we took the lower passage, which led deeper and deeper into the mountain. Eventually it came to a metal staircase that someone had thoughtfully installed. I photographed Sylvia on it by the light of our torches; took a few goes to get a sharp exposure at a third of a second handheld!
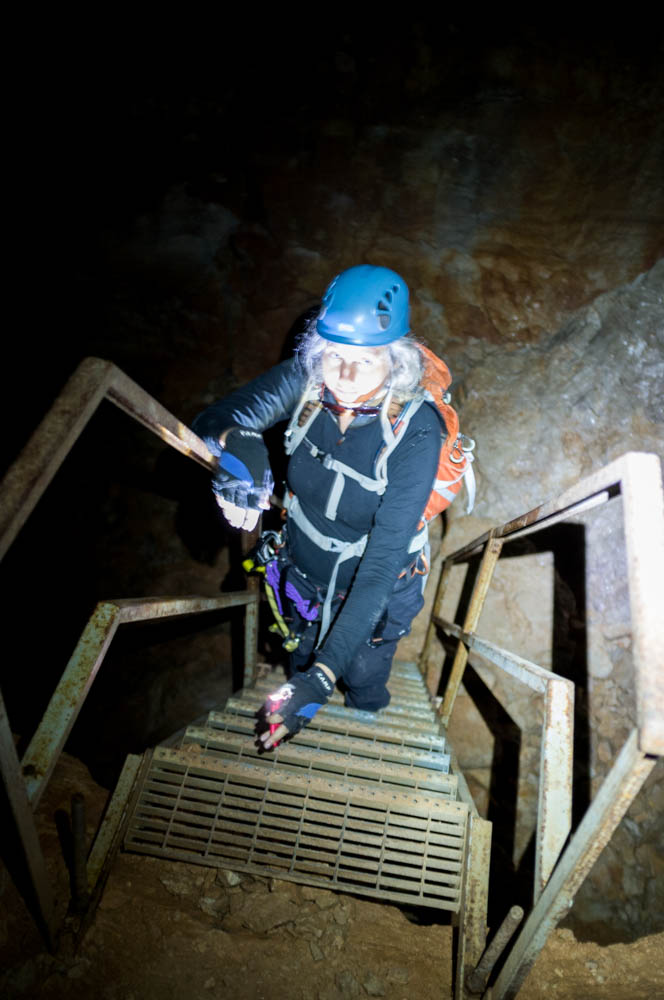
Not an easy photograph to take handheld!
Carrying on, we thought we must be very deep into the mountain when, suddenly, daylight appeared round a corner! The passage had brought us back to the junction. We had become completely disoriented down there.
As we hung around, the noises we had assumed were birds were becoming increasingly agitated by our presence. We then realised they weren’t birds at all, but bats! They were flying around in the gloom and were not small ones. We decided to leave them to it and retraced our steps, out of the cave, along the precarious ledge, past the climbers, who had now made quite a bit of upwards progress, back along Sentiero Astaldi and thence to Rifugio Pomedes for a late lunch.
The clouds had lifted. The promised thunderstorms failed to materialise. We would have been fine if we’d gone for the summit, but hindsight is always 20:20, and we did some cool stuff instead. I’m up for a rematch with Tofana later in the week, but not tomorrow: they’re forecasting 25cm of snow up there!
Me on Sentiero Astaldi
Pingback: Dolomites 2017, Day 9 – VF Giovanni Lipella | Sarah Brown's Blog